
Seriously — how do they do it?
How do some bloggers create posts that get shared hundreds or even thousands of times?
And attract dozens of quality links that get them ranked highly by Google.
You know the people we’re talking about — everything they publish goes viral.
And you can’t help thinking:
Why can’t that be me?
But you know what? It can.
And you don’t need an insanely popular blog, a huge email list, a Rolodex crammed with influential friends or a heap of time to make it work.
If you know exactly the right type of post to create and the right way to do it, you can dramatically increase your chances of a viral hit without spending days and days.
In fact, the method you’re about to learn will bring you hundreds of shares and thousands of new visitors to your blog in just a few hours.
So, are you ready to learn how to have maximum impact in minimum time?
Why People Love Long List Posts
It’s no secret that the Internet loves list posts — and the longer, the better.
Headlines that lead with an impressively large number imply long content, and people naturally associate longer posts with more effort and higher quality. In fact, statistics show that long content gets shared more.
But here’s the thing about so-called “monster” lists posts.
They’re a ton of work to create.
Want to write an original post called “101 Ways to Do X” or “237 Ideas for Y”? Great! But expect to spend at least 20 hours researching and writing it.
However, one type of list post looks epic but takes much less effort to create. And it has other benefits that make it even more likely to go viral than the original lists described above.
Introducing… the Curated List Post
Original lists take a long time to create because you’re creating all the content from scratch. You’ll need to spend many hours conducting original research or brainstorming ideas to build your list.
Sometimes, that’s worth the effort, for instance, if you’re creating the “pillar” content that will support your blog for years to come. But you can’t do that every week — you’d be exhausted.
And that’s where the curated list post comes in.
A curated list post is a collection of links to content that already exists — content you didn’t have to spend the time to create.
In fact, content like the following:
- 126 Must-Read Traffic Generation Case Studies
- The 100 Blogs You Need In Your Life
- 100 Incredible Infographic Tools And Resources
The first one received hundreds of shares and thousands of visits, and it only took me a few hours to write and promote.
Textually, these posts are unique — we’re not talking about anything that will get you penalized by Google — but other people have already done most of the hard work.
But hang on, won’t you still need a lot of time to research the 100+ links included in your curated post?
Actually, no. Not if you use one of the sneaky shortcuts you’ll learn in this post.
And not only do these list posts take less time to create than you might think, but mixing in a hefty helping of powerful bloggers (the authors behind the links on your list) also has another benefit — abundant shares.
Why Curated List Posts Almost Always Get Shared by Big Names
When you write a curated post, you’re not only creating new content for your blog, but you’re promoting the work of others — the people who created the linked content.
And here’s the happy side-effect:
People love to share articles that feature them.
Just ask any blogger and you’ll find it’s true. I’m no different — if you feature me or one of my articles in your post and ask me to share it, you’re almost guaranteed that I will. It’s netiquette — the common rules of the road etiquette for today’s blogger.
If I don’t share, I might not get featured again.
Inevitably, many of the people who wrote the articles you’ve featured will be influencers with good-sized social followings, which leads to another beneficial effect:
People share content that people they trust share.
If someone who I think is credible vouches for something, I also feel safe vouching for it — this is essentially how social proof works.
If I can get the ball rolling to gain a few shares, more people will join the party. So if you can get a bunch of influencers to share your post, their audiences will likely follow suit.
Of course, you need to choose the right topic.
How to Come Up with the Perfect Idea for Your Curated Post
In general, curated list posts fall into one of the following three buckets:
- Lists of articles. These are lists that showcase high-quality articles that cover the same topics (e.g. conversion rate optimization).
- Lists of websites. These are lists that show off the best blogs/websites in a particular category (e.g. the best Internet marketers).
- Lists of tools. These are lists that feature best-of-breed tools of a certain type (e.g. content marketing tools).
In fact, the post examples I gave earlier fall into one of these categories and received hundreds of shares without having a huge audience built-in.
But for the rest of this post, let’s assume we’re writing the first type — a curated post featuring a list of articles. Regardless, the principles you’ll learn apply to all three types.
Let’s see how to do it.
STEP 1: CHOOSE THE UNIFYING PRINCIPLE FOR YOUR LIST
Imagine if you visited a museum and objects from different eras and places were all jumbled together in the same room. It would be confusing and kind of pointless, right?
Likewise, if the articles on your list don’t have something in common your post will just feel like a random collection of links.
So you need to ask yourself:
What unites these articles to make them all belong on the same list?
Usually, it comes down to article type and topic.
For example, 64 Of The Best Channel Marketing Case Studies is a list of 64 articles with the type case study and the topic channel marketing.
As another example, 100+ Of The Best Internet Marketing Ultimate Guides is a list of 100 articles with the type ultimate guide, and the topic Internet marketing.
This way of thinking not only helps your curated list post feel meaningful but also guides your strategy for finding the articles via search engines, which we’ll discuss below.
Ultimately, what type and topic you choose is up to you, but think about relevance and breadth.
Relevance, of course, means that the finished post will be interesting to your target audience. It’s common sense but important to keep in mind.
But what do we mean by breadth?
Considering the post itself is likely to have 100+ articles (or tools, or websites), you need a topic with enough scope to cover in many different ways without it becoming boring or repetitious.
So, for instance, a topic like “grammar mistakes” is too narrow because a list of 100+ links will probably contain a huge amount of overlap.
STEP 2: RESEARCH THE COMPETITION (AND BEAT THEM AT THEIR OWN GAME)
Here’s the thing about any epic content — it’s usually judged against what already exists on the same subject.
So you’d be smart to research the competition — other long list posts on your topic.
Normally, you’d want to pay close attention to the following:
- How long is the list? (i.e. how big is the number in the headline?)
- How attractive is the overall design?
- How comprehensively do they cover the topic? (i.e. are all the relevant sub-topics covered?)
- How up-to-date is the information?
Aiming to beat the current best posts on your topic on every front is essentially the strategy recommended by Brian Dean in his Skyscraper technique, and if you do, the results can be impressive.
However, it’s time-consuming — perhaps as time-consuming as creating an epic post from scratch.
So here we’re focusing on a more quick and dirty solution — featuring more quality links than the reigning champion.
And here’s why: many people share posts on the strength of the headline alone, without even visiting the post. So the size of the post is the most important factor.
Finding the best content currently out there on your topic is as simple as running a Google search. Most curated resource articles have similar titles:
- Top 100 Articles On [Topic]
- 100 Of The Best [Topic] Posts
- 100 [Topic] Resources
For example, the following results are from a search for Conversion Rate Optimization articles:

Once you feel comfortable you’ve found the best, say, ten posts covering the same topic as your proposed post, skim them to make sure you have a good appreciation for what you have to beat.
How to Curate Your Epic List Like a Ninja
By this point, you might be scratching your head as to how you’ll produce a list post of this magnitude without going insane.
Where, for instance, did I find 126 traffic generation case studies for my post? Did I just read about traffic generation all day?
(Actually, yes, but that’s because I’m a traffic junkie. But it’s not how I created the post.)
You have two sure-fire ways to quickly and painlessly collect articles for your curated list post. One is pretty obvious, but the other is downright devious.
METHOD 1: SOURCE YOUR OWN ARTICLES FROM GOOGLE
If you’re collecting tools, articles, or websites, your natural inclination will be to use Google.
And I can see you now: typing some relevant search terms into Google, clicking “Search,” opening up each article one by one and then adding the URL to a spreadsheet if it seems like a good fit. And repeating it for page after page after page of search results.
That’s going to get dull pretty quickly, right?
Well, here’s how you do it like a ninja.
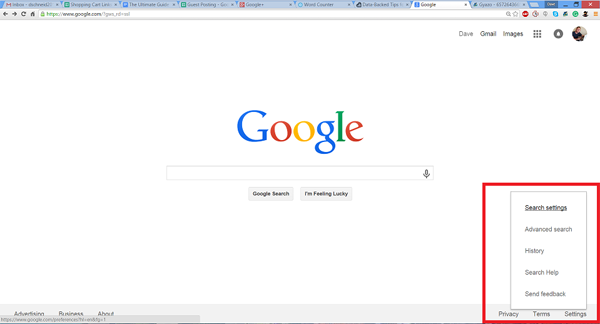
First, click on “Settings” in the bottom right of the Google homepage. When it opens, click “Search Settings”:
On the next page, change Google instant predictions to “Never show Instant results,” and move the “Results per page” to 100. Then click “Save.”
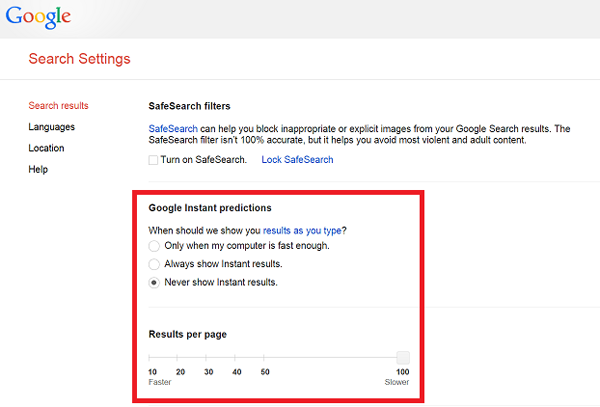
Now, when you run a Google search, you’ll get 100 results per page. I bet you didn’t know you could do that!
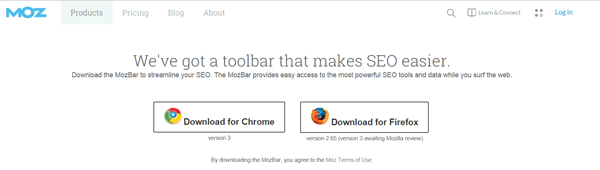
Next, download this free tool from Moz for Chrome or Firefox, which (amongst other things) makes it super easy to gather links to content found via Google Search.
With the MozBar installed, run a search for the type of article that will be a part of your list. Some searches to start with include:
- The best articles on [Topic]
- Tricks and tips for [Topic]
- How to do [Topic]
- [Topic] case studies
- The ultimate guide to [Topic]
- Advanced [Topic]
- [Topic] for beginners
- Why you need [Topic]
If the results contain too many irrelevant links, you can use Google search operators to narrow your search.
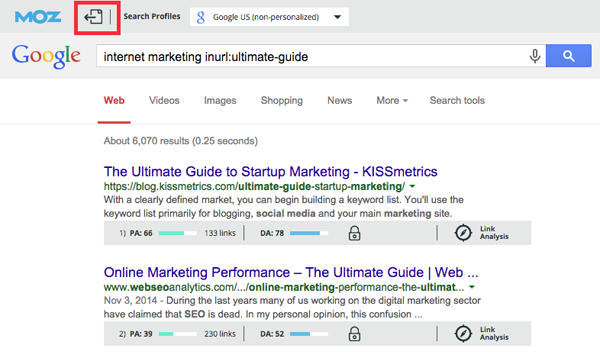
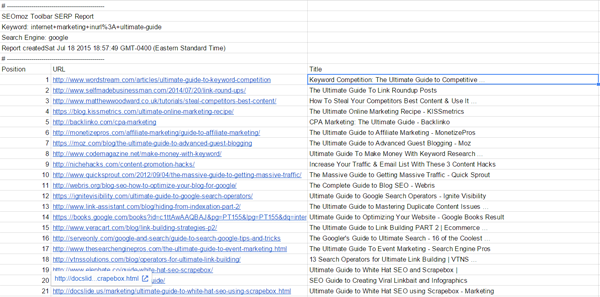
For example, if I were looking for ultimate guides about Internet marketing, I could run the following search:
internet marketing inurl:ultimate-guide
This forces each result to include “ultimate-guide” in the URL (as well as being related to Internet marketing), which should help make them super relevant.
Note: Google search operators are not absolutely necessary but may improve search relevancy. Remember, you’re looking at 100 results at a time.
Once you have a page of mostly high-quality results, you can use the MozBar to export these to a CSV file, which you can open in Excel or almost any other spreadsheet tool.
Here’s how to do it in Chrome:
When you open the file, it’ll have a ton of columns, but in this case we’re only interested in the first two, which contain the URL and the title:
Quick tip: Sometimes the MozBar truncates the title if it’s too long. Luckily, you can use a free tool like SEO Chat’s Title Generator to get the title and meta description for up to 100 links at a time and download as CSV. (The meta description is useful because you can use it as the basis for a brief description of the post in your curated list.)

METHOD 2: SOURCE ARTICLES FROM OTHER LIST POSTS
The second method is even simpler, and it’s a little sneaky too.
Instead of relying on Google to help you find articles one-by-one, you source your articles from other list posts on your topic — exactly the same posts you’re trying to beat for epicness.
In other words, you’re combining the work of other bloggers to create a super-post of greater size and scope.
For example, if I wanted to write a post about the best content marketing tools, I could draw from these existing posts:
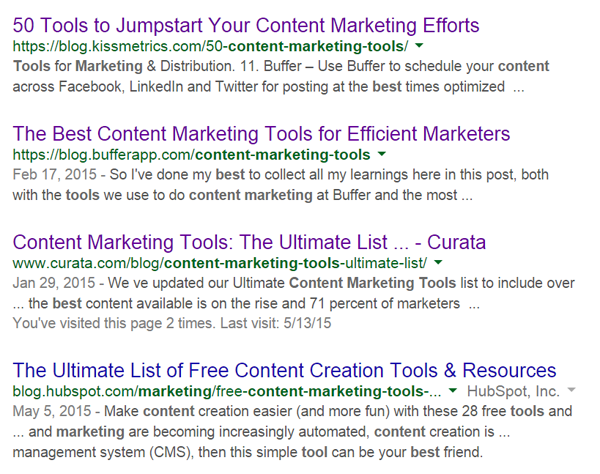
To make things easy, I can head to any of those pages and extract all of their links using an HTML extractor tool. For example, when I extract the links from the 50 content marketing tools post, I get the following:

Again, I can put these links into SEO Chat’s tool to get the titles and meta descriptions and download as CSV.
Do this a few times and you’ve just swallowed everyone else’s list and made your own monster list.
Yes, it feels a bit sneaky, but the truth is that those authors probably did something similar to come up with their list, just on a smaller scale.
MAKING SURE YOUR POST ONLY INCLUDES HIGH-QUALITY LINKS
So you’ve just built a spreadsheet containing a few hundred links to articles on your topic.
But how do you know if they’re any good? And what about duplicates (which can easily appear with Method 2 above)?
The only way to be sure an article meets your standards is to go through it yourself, but of course it’s time-consuming.
That said, you may have noticed I like to lean on free tools and formulas to make life easier, and quality control is no exception.
Firstly, I use a simple Excel (or Google Sheets) function to remove any duplicate URLs.
Assuming that your links are in column A, just enter the following formula at the top of the next empty column:
=UNIQUE(A:A)
This formula filters the list of links to include unique values only, thus removing any duplicates.
Once you’ve removed duplicate articles, you’ll want a quick way to identify and remove poor articles.
For this, you can leverage a bulk social share counter, which allows you to add multiple URLs and get the share counts, which can then be downloaded into a CSV.
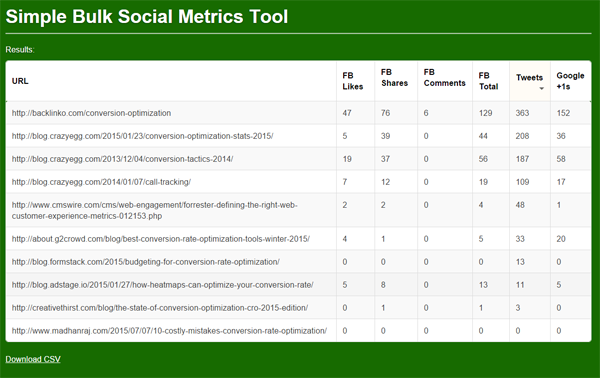
The above tool doesn’t require registration but restricts URLs to ten at a time. SharedCount allows many more links but requires registration (it’s free though!)
If an article has at least a few dozen shares, it’s likely a quality article from a quality site. If it has few shares, more often than not it is a lower-quality article.
This technique allows you to weed out the poorer articles quickly, and if you choose to go through the articles manually afterwards, it won’t consume as much of your time.
How to Assemble Your List into the Curated Post
How you format and style the post is really up to you, but you need to make a few decisions.
Will you simply list the linked article titles, or will you write descriptions for each?
Listing the titles is a lot less work (and can mostly be generated from your spreadsheet data), but it also puts less unique content on the page, which may affect the perceived value.
But while adding commentary to each link will boost the perceived value, over the course of 100+ links, it might become tedious for the reader, detracting value from the overall goal to highlight the articles themselves.
(If you do decide to add descriptions, remember the earlier point about using the meta descriptions from the individual articles as the starting point for your own.)
Will you break the list into different categories or chapters?
Again, simply listing the links is easier, but organizing them into helpful categories or chapters will create a better user experience.
Usually, it’s worth organizing the links in some way because the longer the list, the more overwhelming a single list of links will seem. Categories also help the reader find the links that are of the most interest to them.
Will you enhance the design of the post with images?
Personally, I think adding images to each chapter is a quick and easy way to improve the visual appeal and break up what would otherwise be a long article filled purely with links.
It’s also a way to differentiate your post from other epic lists on the same topic.
Luckily, you won’t struggle to find free images to include in your post. In fact, many curated resource posts are available on that topic alone, such as this article featuring over 74 Of The Best Free Stock Photo Websites (shared 12k+ times).
Will you use chapter descriptions or just headings?
As we’ve established, explaining each article can take significant time. So if you choose to exclude descriptions, I highly recommend writing an introduction, thus ensuring you have unique content on the page explaining what the post is about and why you selected these particular articles.
If you’ve divided the links into categories or chapters, an introduction for each will also help the reader put what follows into context and increase the perceived value.
Will you build a table of contents?
If you decide to split your links into different chapters and have more than 50 links or so, you should seriously consider having a table of contents. It enhances usability and just adds to the wow factor, which is why all the best guides seem to do it. Fortunately, it’s not hard to do.
EXAMPLE
To put the five questions above into context, for our guide on 126 Traffic Generation Case Studies, we made the following decisions:
- We included the titles and links in the list but didn’t write a description for each one.
- We broke the list into different categories relating to traffic generation, like social media, eCommerce, etc.
- We added a small icon image and an introductory paragraph to each chapter.
- We built a table of contents.
Here’s what a typical chapter looked like:

How to Format Your Post in WordPress
You may have noticed a lot of your work is in spreadsheets — how does this become an actual blog post?
In practice, it’s a combination of using some clever spreadsheet tricks to generate the basic HTML, and then tidying things up in the WordPress visual editor.
If you’re using separate categories, one helpful tip is first to copy all of the links for a particular category into a separate spreadsheet (or sheet within the same overall spreadsheet document.)
To create the links that form the backbone of your post, I like to bust out a few formulas that will make it easy to go from your spreadsheet to the text editor in WordPress.
While I can’t give you a one-size-fits-all solution for creating the HTML that will work for every different style of list post, I can give you a time-saving tactic you can easily adapt. It uses some basic Excel/Google Sheets functions that automatically produce the desired HTML for a list element based on the titles and links you already have in your spreadsheets.
Let’s say in column A you have the article’s URL and in column B you have its title (no header row).
Here’s a formula that will produce a single list element with the title, hyperlinked:
"<a href="""&A1&""">"&B1&"</a>"
Paste this formula into a cell in the first empty column in the first row. Then drag the small box in the lower right-hand corner of the cell down the page to apply the same formula to the rest of your links.

Once you have generated the HTML, you can copy it into the WordPress editor. Assuming you’ve already created a new post, switch to the Text editor, and then paste the whole column of generated HTML.
Once you’ve done that, you can switch to Visual mode for additional formatting.
Note: If you like this approach, here’s a pre-built Google Sheet, which includes a more advanced formula to account for descriptions and some basic paragraph styling for your list items. (To use it, go to “File > Download As” and download as an Excel document, or log into your Google account then go to “File > Make a copy” to create an editable copy in your personal Google Drive.)
CREATING A HANDY TABLE OF CONTENTS
Let’s also discuss the HTML for the Table of Contents (TOC).
What makes a TOC particularly useful is hyperlinking your chapter headings to the relevant parts of the page itself.
To do so you need to create an internal link that references an “anchor” later in the document.
Here’s the HTML for a simple chapter heading within the TOC:
<a href="#chapter1" rel="nofollow">Chapter 1 — Content Marketing</a>
The “#chapter1” tells the browser this is an internal link to an anchor called “chapter1.”
That internal link refers to a spot on the page that is marked up like this:
<a name="chapter1"><h2>Content Marketing</h2></a>
So now, when someone clicks on Chapter 1 in the TOC, they will go directly to that spot.
Again, you can shuttle between the Text and Visual post editors to make sure the HTML and the formatting are correct.
How to Promote Your Post to Get Maximum Exposure
Alright, you’re at mile 25 — so don’t give up yet.
Once the post is assembled and published, you still need to promote it. That might seem like a lot of work, but it’s easier than you think.
Besides, if you didn’t intend to go all the way, there was no point in writing the post in the first place.
Content promotion has been covered in detail on this blog, and the truth is, all the usual rules still apply to your post. But you must do a couple of specific things — and they both relate to getting your influencers on board.
You may have noticed we haven’t said an awful lot about the influencers yet. But even though you haven’t targeted specific influencers upfront, you’ve effectively already done so by including their work in your post.
In other words, you’ve already baited the trap.
Now you just need to let them know they’ve been featured, through email and social media.
Once you do that, your post is going to fly.
So let’s look at what you need to do.
1) EMAIL THE INFLUENCERS YOU FEATURED IN YOUR POST
You need to email everyone you featured in the article, which starts with finding everyone’s email address.
Finding email addresses of bloggers is not hard — in fact I can name 30 different ways. Here are just a handful of places to look:
- Contact form or About page — sometimes bloggers include emails on these pages.
- Page footer — look for a contact link in the footer as you can often find a “mailto:” address.
- Blog newsletter — opt into the blog’s email list and look at the “Reply to” email address of any email they send because this is often an address the blogger checks regularly.
Once you have addresses for your influencers, here’s an email template to send when you’re ready:
Hey, [First Name]!
Just wanted to pop in and say that we’ve included you in our roundup of top content marketing tools (it’s a broad list of over 200).
Check it out!
Thanks for providing a valuable service, and if you feel inclined to share the post with your audience, we’d appreciate the exposure.

Cheers!
Dave
The key features are:
- You address them personally and thank them for providing a valuable resource.
- You quickly direct them to the article (i.e. you don’t include a lot of preamble).
- You give them an easy way to share the post in the email itself (In the template above, I used Click to Tweet.)
A typical message to include in your Click to Tweet text is something like:
"wow, 200+ content marketing tools @ninjaoutreach http://ninjaoutreach.com/best-content-marketing-tools/"
2) TAG EVERYONE ON TWITTER & GOOGLE+
Email is usually the best way to alert influencers of your post. But in reality, not everyone responds to email. Sometimes it goes to an assistant, and sometimes you just can’t find a valid address in the first place.
Using Twitter or Google+ is an alternate approach to email because it’s so dang simple for the influencer to share it once they see it.
In fact, this is the same approach that Brian Lang recommended in his Smart Blogger post on creating an expert roundup (which is another way to get thousands of shares by featuring dozens of influencers).
Once you have everyone’s Twitter handles and G+ profiles, send out a group tweet and include a few people in it at once. People like being associated with other influencers, and as one person shares it, it tags everyone else again, giving the post additional reach.
Due to Twitter’s length restrictions, you can typically only include around 3 — 6 influencers per tweet, which could require you to send out 1 — 2 dozen similar looking tweets from your account.
If you’re not comfortable with that, you can space them out, perhaps sending one per hour, interspersed with unrelated tweets. Or use a tool like Hootsuite, which allows you to bulk schedule tweets.
You can use the same approach for G+ as well, with the added benefit of no length restrictions; I typically just include everyone together.
Want to Get Shared? Get Sneaky!
Epic lists posts are one of the most reliable ways to get hundreds of shares and thousands of new views for your content.
But they’re also one of the most time-consuming.
That’s why you need to be sneaky and focus on the one type you can create with considerably less effort — curated list posts.
You’ll be surprised just how much you can automate through the use of free tools and sneaky Excel formulas, making the whole process relatively quick and easy.
Whether you’re the busiest (or even, laziest) blogger, follow these guidelines, and you have a shot at creating a list post that goes viral.
Not just that, you also get to build relationships with influencers that could lead to all sorts of future opportunities.
So, what are you waiting for? Pick a topic and get started!
About the Author: David Schneider is the cofounder of NinjaOutreach an all in one Prospecting and Outreach tool, which was created to streamline the process of connecting with influencers. He can also be found @ninjaoutreach and his business blog, SelfMadeBusinessman
Source: https://smartblogger.com/traffic-hack/
No comments:
Post a Comment