Go on. Be honest.
As a blogger, you have a love-hate relationship with social media.
You love the idea of your content going viral and bringing thousands of new readers to your blog.
But you hate the fact that this kind of social success is so hard to achieve in practice.
Regardless, you always share your latest posts and ask others to do the same.
And you pick up a few shares here and there, but little more.
In fact, every time you post your content on Facebook, Twitter or Google+, it feels like tossing a coin into a fountain and making a silent wish.
You secretly hope that this will be the one that catches fire, but deep down you know it probably won’t be.
And you just can’t shake the idea that you might be missing a trick.
But what else can you do? Sharing is down to other people. It’s out of your hands, right?
Wrong.
What you may not realize is that the moment you click publish on a new post, you may already have condemned it to social obscurity.
Unless you come to grips with something called social metadata.
What the Heck is Social Metadata?
In a nutshell, social metadata enables your content to be presented in the best possible light when shared on social media.
Instead of relying on Facebook, Twitter and the other social platforms to guess how your content should be displayed in their social feeds, you can tell them exactly what you want.
But that’s what social metadata does, not what it is. So let’s rewind and ask a more basic question: what is metadata?
Metadata, quite simply, is data about data.
For bloggers, it means extra information about your content that may not be visible to your readers but can be picked up by other services, such as Google’s search robots.
A good example of basic post metadata is the meta description of a web page, which Google can choose to display in its search results:
Here the text below the headline is extracted automatically by Google from the post, but it doesn’t form part of the visible content. It’s metadata created by the blogger, behind the scenes.
Social metadata on the other hand is not designed for Google to read, but rather for the major social platforms.
And the difference between the two is that these social snippets appear in social streams like your Facebook news feed or Twitter timeline instead of Google’s search results.
Why Smart Bloggers Are Already Using Social Metadata
We’ll go into the details shortly, but here’s the bottom line:
If you don’t take advantage of social metadata, you risk your posts looking crappy when shared on social media.
And of course, this could have a significant impact on how widely people share them.
To understand this a bit better, let’s take a quick look at how social sharing works.
WHAT HAPPENS WHEN YOUR CONTENT GETS SHARED
When your blog post is shared on social media (either by you or someone else), the social platform (e.g., Facebook) grabs a copy of the post using the link provided and tries to extract some useful information, such as the post title, a short description, a featured image, etc.
If you’re using social metadata on your blog, this tells the social platform about your post in a language it understands. In other words, you get to control which information is extracted for use in sharing.
And the key point is that if you don’t provide social-specific metadata, the social platform will grab whatever data it can find.
Sometimes the result is okay, but more often it’s not.
The Perils of Ignoring Social Metadata
Take a look at what happened when this post about hot dog toppings from Epicuriouswas shared on Facebook:

Yes, the brutally-cropped image is a fail, but that’s not the egregious error here.
Since the blog’s standard post format displays the writer’s bio first – and since no social metadata was entered to tell it otherwise – Facebook pulled the first 160 characters from the top of the post as the description, which in this case is a description of the author, not the post.
Great for Kristin Donnelly, but terrible for shareability.
We don’t really care who wrote this, at least not to begin with. So don’t tell us about the author; tease us with thoughts of sauerkraut and Thai chili sauce. Right?
Finally, the title is too long because it includes the “| Epicurious.com” label, which might look fine in your browser’s title bar, but only serves to clutter things up when sharing.
Here’s another example from Arizona Highways Magazine:
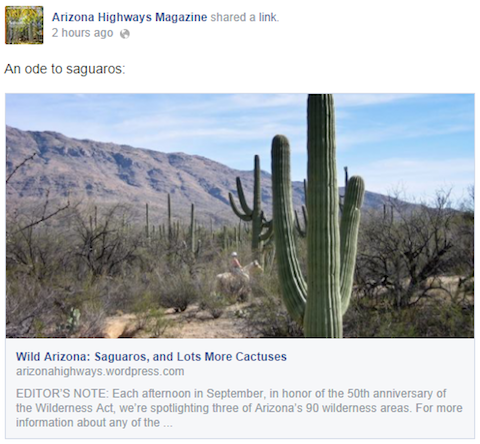
The picture is certainly eye-catching, but again, no social metadata description was configured, so Facebook just pulled the first 160 or so characters from the top of the post.
This might not have been so bad if this wasn’t part of a series of posts with the same opening text. Here’s another post in the series:

See? The “EDITOR’S NOTE:” and the repetitive text that follows could (and should) have been used for descriptive text specifically about this post.
One last example, this time a Facebook share of a post from Florida Citrus:
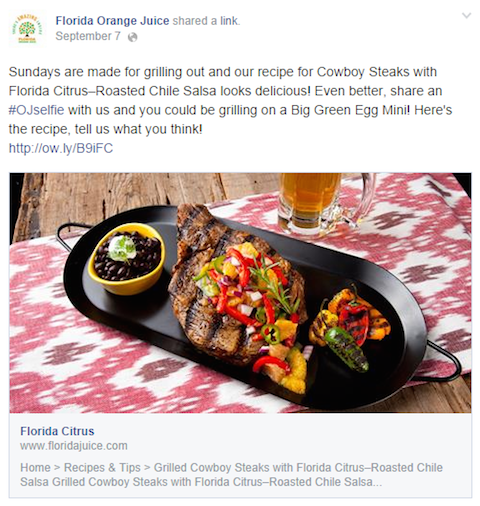
This is the biggest fail of the bunch.
Not only did Florida Citrus neglect to customize the social metadata description for this post, but they also didn’t even include a basic metadata title and description. And Facebook pulled its description from the top navigation text. Come on, Florida!
The important point here is to make sure you control the data that’s displayed. It makes your content more shareable and improves its longevity.
In the worst case, if your post has no metadata, it might pull a description from your crafty lede or even your navigation or menus.
So implementing social metadata is crucial. But it doesn’t work the same way across all of the social platforms.
Let’s start with Facebook.
Understanding Facebook Social Metadata: Open Graph
Facebook uses a standard called Open Graph to determine what your page is about.
Open Graph is a set of social meta tags that feed Facebook (and other social platforms) with a specifically crafted social message about your blog post. When incorporated properly into the code of your blog post, Open Graph tags can increase your chances of people sharing and engaging with your posts.
Although you don’t need to worry too much about the technical details, and just to give you a flavor of how this works, these are the basic Open Graph tags your average post can include:
- og:title – Title of your post, minus the branding.
- og:site_name – Name of your website (not the URL).
- og:url – The URL of your post.
- og:description – A short, catchy description of your post.
- og:image – The image associated with your media with a suggested size of 1,200 by 630 pixels.
These tags are embedded within the code (i.e., HTML) of your blog post. You can see them at work here:
<meta property="og:title" content="How to Get Interviewed by Popular Blogs (Even If You're Not a Big Shot)" />
<meta property="og:site_name" content="Smart Blogger" />
<meta property="og:url" content="//smartblogger.com/expert-interviews/" />
<meta property="og:description" content="Are you tired of being an internet nobody? Learn how to join the ranks of the recognised experts by getting interviewed on popular blogs." />
<meta property="og:image" content="//smartblogger.com/wp-content/uploads/2014/09/expert-interviews.jpg" />
FACEBOOK SOCIAL METADATA IN ACTION
Let’s look at some examples to see exactly how this works.
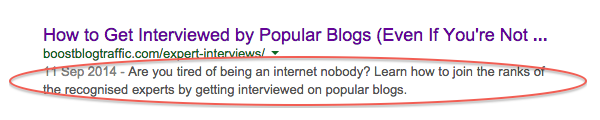
First, here is an example of a well-configured post:

Why is this post perfectly configured? Because, underneath the status update, Facebook has pulled the following directly from the post:
- A correctly sized image.
- A short, catchy title, minus any branding.
- A concise post description.
Here’s how the original post looks on the site where it was published – Mashable.com:

Without the addition of the Open Graph social metadata, Facebook would have pulled the SEO meta description or the post introduction text for the description.
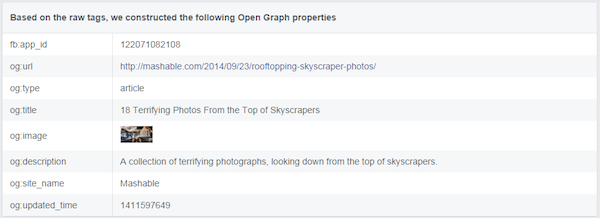
Facebook actually provides a debugging tool to allow you to see which Open Graph tags it can find in a web page. Here’s the output from the Mashable post above:
Understanding Twitter Social Metadata: Twitter Cards
Although we’ve focused on Facebook so far, it’s not the only social platform to support additional meta tags for describing your content.
Similar to Open Graph, but developed and used solely by Twitter, Twitter Cards are a set of social metadata tags that give you control over how your content looks when shared on Twitter.
Twitter has seven different card types depending on what type of media you primarily share. The two most useful types for bloggers are the Summary or Summary with Large Image types.
Designed to give Twitter users a preview of a post, the Summary Card is the preferred option for most blogs. It includes a title, description, image thumbnail and Twitter account attribution.
The social metadata tags for a Summary Card include:
- twitter:card – The type of card, in this case “summary”.
- twitter:title – A short, descriptive title of 70 characters or less.
- twitter:description – A concise, 200-character or less description of your post.
- twitter:image – The URL to a unique image representing the content of the page. Image must be a minimum size of 120 by 120 pixels and less than 1MB in file size.
If you want to give prominence to the image over the description, the Summary Card with Large Image is designed to show Twitter users a large image that links to your post.
The tags are the same except twitter:card specifies “summary_large_image,” and the image in twitter:image should be at least 280 by 150 pixels.
The Photo Card and Gallery Card may come in handy for photography blogs – but here’s a full list of Twitter Card Types.
TWITTER SOCIAL METADATA IN ACTION
Here is an example of a well-configured Twitter Summary Card from this post on CBS Sports.
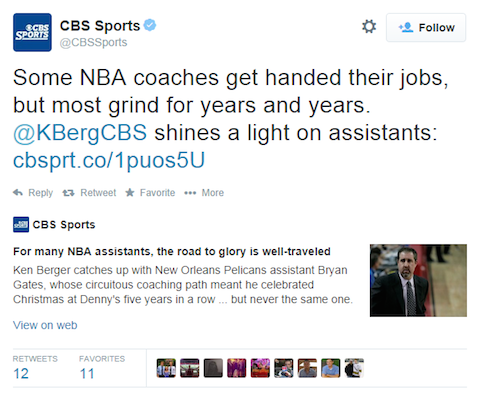
Notice how the title and the description pulled from the post provide a concise overview and neatly fit the space allocated.
Here is the code from this page:
<meta name="twitter:card" content="summary" /> <meta name="twitter:site" content="@cbssports" /> <meta name="twitter:creator" content="@KBergCBS" /> <metaname="twitter:url" content="http://www.cbssports.com/nba/writer/ken-berger/24723463/for-many-nba-assistants-the-road-to-glory-is-well-traveled" /> <meta name="twitter:title" content="For many NBA assistants, the road to glory is well-traveled" /> <metaname="twitter:description" content="Ken Berger catches up with New Orleans Pelicans assistant Bryan Gates, whose circuitous coaching path meant he celebrated Christmas at Denny's five years in a row ... but never the same one." /> <metaname="twitter:image" content="http://cbssports.com/images/visual/whatshot/092414bryangates.jpg" />
Note these two additional tags:
- twitter:site – The @username of the site.
- twitter:creator – The @username of the content creator.
The creator tag in particular is important because it acts as a digital signature, identifying the person who created the content. We’ll see how to implement that shortly.
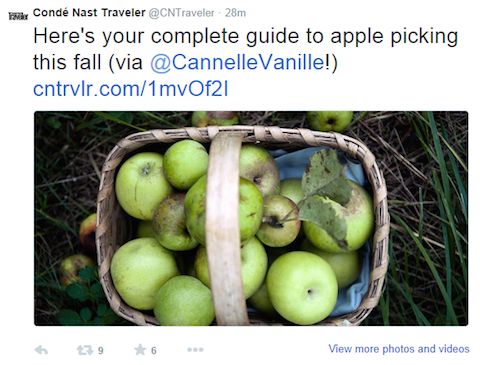
Here is a well-configured Summary Card with Large Image from a post on Condé Nast Traveler:
Here is the code associated with this post:
<metaname="twitter:card" content="summary_large_image">
<metaname="twitter:site" content="@cntraveler">
<metaname="twitter:title" content="Your Complete Guide to Apple Picking in the Fall">
<metaname="twitter:description" content="Now that autumn has officially started, take a weekend trip to your nearest apple orchard for a perfect day outdoors.">
Just for fun, let’s compare the difference between tweets with and without Twitter Card metadata.
Compare this tweet:

To this one, which was a few tweets down the feed:

No, your eyes are not deceiving you, tweets with summary pages appear in the stream in a larger font size.
When you click on “View summary,” you’ll get the full summary card:

What’s the difference between the two tweets? The first is devoid of Twitter card metadata, whereas the second has it configured correctly.

What’s the difference between the two tweets? The first is devoid of Twitter card metadata, whereas the second has it configured correctly.
Seems the Hollywood gossip section of Vanity Fair’s website gets more meta attention than the style section.
What About Metadata for Other Social Media Platforms?
Just like Facebook and Twitter, all major social media platforms use metadata to identify the main elements of a post.
The good news is that Google+ and LinkedIn also take direction from Open Graph, so if you’ve got your Facebook meta tags set up correctly, you’re good to go.
Hallelujah!
Now that you understand how these social metadata tags are used, don’t freak out and think that you have to learn advanced HTML. There are tools!
How to Get Social Metadata Working on Your Blog Without Breaking a Sweat
You’ve seen the benefits of implementing social metadata on your blog, but some of that code looks a little scary, right?
Don’t worry; as is often the case when you’re running WordPress, you can use a plugin to do all the heavy lifting.
One of the best options is the WordPress SEO by Yoast plugin, which not only helps you manage your blog’s SEO, but also has settings for Facebook Open Graph, Twitter Cards and Google+.
Of course, you have some other options too. Besides Yoast, Twitter also recommends the Jetpack and JM Twitter Cards plugins, and Facebook has its own official Facebook plugin for WordPress.
Yoast, however, is easy to install and gives you what you need to ensure that social metadata is configured and included in your post.
INSTALLING AND CONFIGURING THE YOAST PLUGIN
Let’s see how to properly configure the Yoast plugin to include social metadata in your posts.
Step #1: Install the plugin
You can install the WordPress SEO by Yoast plugin as you would any other plugin by selecting Plugins > Add New from the WordPress left-hand menu.
If you type “WordPress SEO” then click Search Plugins, it should be the first one returned.
Once you have the Yoast plugin installed and activated, you’ll need to get it configured for each of the major social platforms.
Step #2: Configure Facebook social settings
Follow these steps:
- In your Yoast settings, go to “Social” and click on the Facebook tab.
- Check the box next to “Add Open Graph meta data.”
- Save changes.
You can explore other settings on this page, but in terms of social metadata, Facebook is taken care of.

Step #3: Configure Twitter social settings
Now follow these steps:
- Click on the Twitter tab.
- Check the box next to “Add Twitter card meta data.”
- Add your Twitter username (without the “@” symbol). Note that this is the Twitter account associated with the blog as a whole, which may or may not be the same as your personal Twitter account.
- Choose the type of Twitter card you want to use for your posts (Summary or Summary with Large Image).
- Save changes.
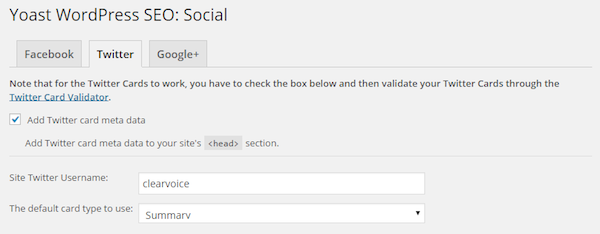
One final step required for Twitter is to visit your WordPress user profile and ensure that your Twitter username has been completed – it’s this field that’s used to populate the twitter:creator metadata field.
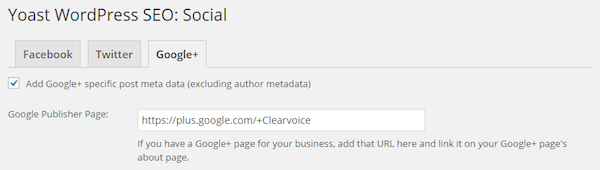
Step #4: Configure Google+ social settings
Follow these steps for Google+:
- Click on the Google+ tab.
- Check the box next to “Add Google+ specific post meta data (excluding author metadata).”
- Save changes.
HOW TO ADD SOCIAL METADATA TO YOUR NEXT POST
You’ve now completed the basic configuration, but of course you need to add content-specific metadata each time you create a new post.
To do that, first scroll down to the WordPress SEO by Yoast section and then follow these steps one-by-one:
Step #1: Add the SEO Title and Meta Description
First, under the General tab, enter an SEO title and Meta Description.
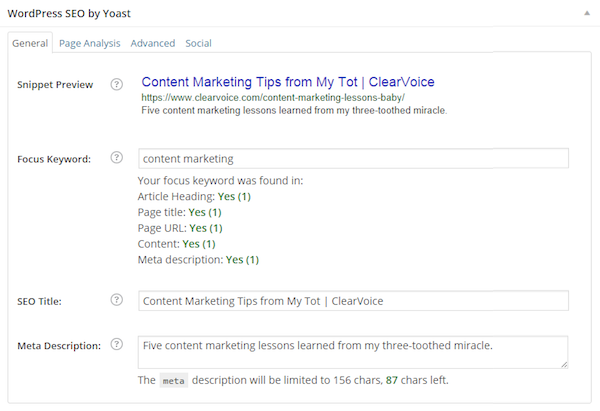
These are the values that will be picked up by Google for display in its search results, but also the SEO Title will appear in the social metadata for Facebook and Twitter.
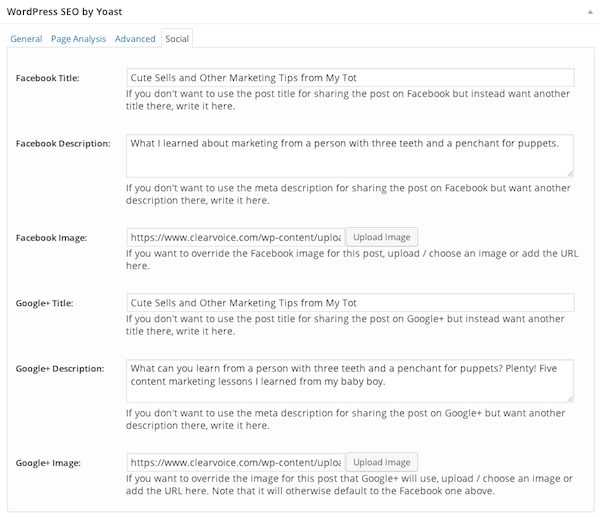
Step #2: Add your remaining social metadata
Next, click on the Social tab and enter descriptions for Facebook and Google+, as well as the URL of an image optimized for Facebook.
You might want to use different descriptions for Facebook and Google+ to reflect the different audiences of the two platforms.
And when it comes to picking an optimum image size for each platform, Sprout Social has a fantastic resource here: Always Up-to-Date Guide to Social Media Image Sizes
Step #3: Publish and test your post
Once you’ve published your post in the normal way, you can check how your post will appear when shared.
To preview your post as it will appear when shared on Twitter, copy and paste your URL into the Twitter Card Validator to test for proper configuration.
Note that the first time you run the card validator, Twitter requires approval.

If your preview is not displaying correctly, check your code. Right click on your blog post page, choose “View Page Source” and look for the Twitter card code toward the top of the code.
You can also paste your link into the Facebook Open Graph Debug Tool to test the post for proper configuration and get a preview of how the post will appear:
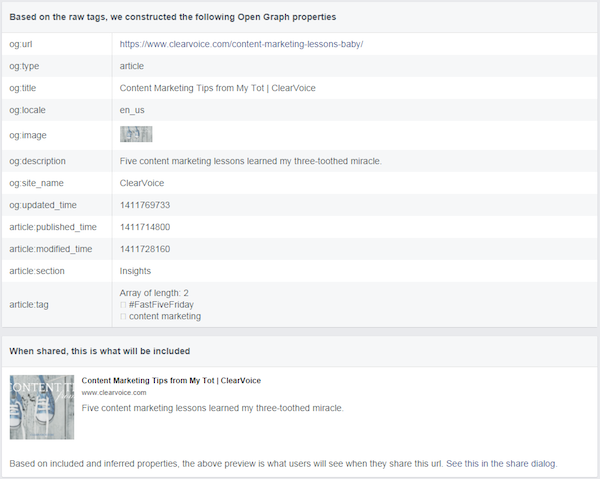
Because other social platforms (besides Twitter) use the Open Graph markup, odds are in your favor that if you pass the Facebook debugger tool test, your post will display correctly on other mediums.
For instance, you can test your link in the Pinterest Rich Pin Validator if you plan to pin it.
To see how Google+ will render your post, simply log in to your Google+ account and go through the initial steps of sharing your post. You’ll see a preview before you actually have to click Share, so you can simply cancel if it doesn’t look quite right.
Discover Your Metadata Mojo and Skyrocket Your Social Shares
Social metadata is here to stay, and exciting new applications for it are emerging all the time.
And while no one knows exactly where it’s heading, one thing is clear:
If you want your content to be shared as widely as possible, you need to get on board.
Sure, the down and dirty details are not for the faint-hearted, but friendly plugins like Yoast keep the nasty technical stuff at arm’s length.
Which means there’s really no reason you can’t start making social metadata work to your advantage today.
So fire up your WordPress dashboard, install the plugin and make it part of your publishing routine.
Because your content deserves the best possible chance to shine.
About the Author: Lisa Kasanicky is content curator and blog manager for ClearVoice.com, a content marketing platform used to connect brands with authoritative content creators. With a writing career that spans more than 20 years, she is author of “The Complete Idiot’s Guide to Girlfriend Getaways” and creator of a website dedicated to beauty and wellness. Circle her on Google+ or follow her on Twitter.,
Source: https://smartblogger.com/social-metadata/
No comments:
Post a Comment